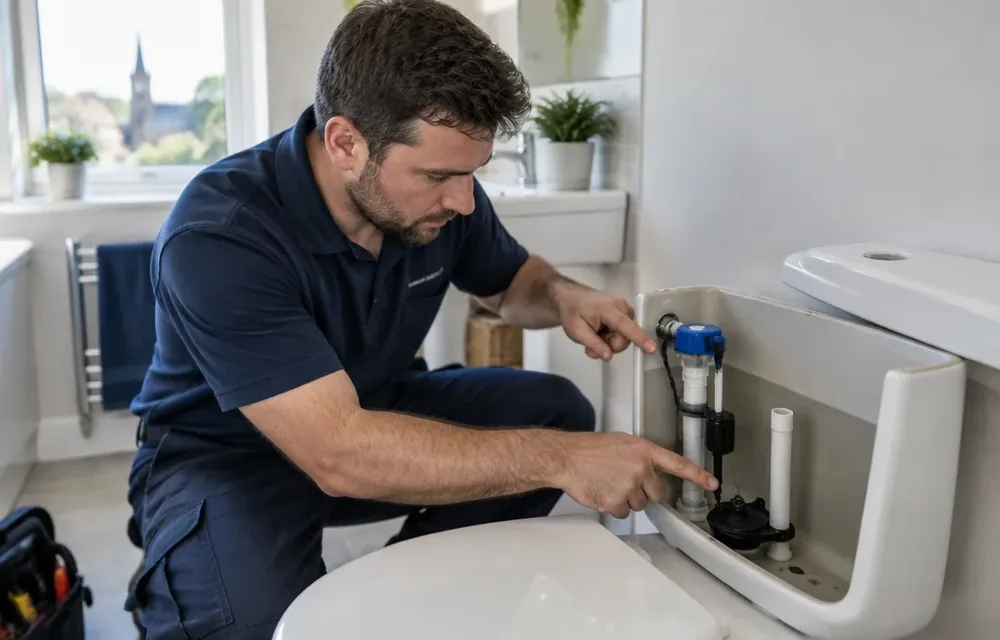
How does a gravity toilet tank work?
Simple answer: a gravity tank stores clean water above the bowl, then drops it through a flapper opening to push waste out, and the fill valve refills the tank afterward. The flapper stays sealed while the tank fills, the fill valve shuts off at the marked water line, and the overflow tube stands by as a drain path if the level rises too high. A running toilet means one of these three parts is letting water pass when it should be holding still.
Fill cycle in order: pressing the handle lifts the flapper by its chain, tank water rushes into the bowl through the flush valve opening, and the falling water level tells the fill valve to open. As fresh water enters, the flapper settles back onto its seat and seals the opening, so the tank can rise to the marked line. The fill valve then closes fully, and a small refill flow tops up the bowl through the overflow tube so the trap seal is restored for the next use.
Where running comes from: water leaves a running tank by one of two paths, and each path points to a different part. A flapper that no longer seals lets tank water slip into the bowl around the clock, so the fill valve opens again and again to replace it. A fill valve set too high, or clogged with grit, sends water straight down the overflow tube without stopping. Both paths sound like running water, but the dye test below tells them apart in minutes.
Which parts fail, and how do they sound or look?
Direct answer: the flapper, the fill valve, the overflow setting, and the chain cause nearly every running toilet, and each one leaves its own clue. A warped or mineral-coated flapper gives short refill bursts every few minutes with no visible tank movement. A gritty fill valve hisses or whines without shutting off, or shuts off only after a jiggle of the handle. Water flowing steadily into the overflow tube means the level is set too high or the valve will not close.
Flapper wear signs: lift the tank lid and look at the rubber disc seated over the flush opening at the tank bottom. Edges that feel wavy, swollen, or slimy, black streaks on your fingertip after a light touch, and a seat ring with mineral crust all mean the seal cannot hold. Chain trouble looks different, with the chain either hanging so loose that it wedges under the flapper or pulled so tight that the flapper never fully seats. Either condition mimics a bad flapper, so check the chain before buying parts.
Fill valve wear signs: watch the valve tower on the left side of the tank while the tank refills after a flush. A healthy valve flows strongly, then closes with a firm click as the float reaches the marked line. A failing valve trickles on after the line is reached, cycles open and closed with no flush between, or needs the float lifted by hand to stop. Grit from supply lines and scale from hard water lodge in the valve seal and keep it cracked open, which is why cleaning the area under the cap sometimes helps for a while before the part needs replacement.
Hands-off tests that point to the right part
Short answer: the dye test identifies a flapper leak, the waterline check identifies an overflow problem, and the shutoff test tells you whether the tank or the supply is at fault. Run them in that order and you will know which part to address instead of replacing pieces at random. None of these tests needs tools, and none of them disturbs piping, so they are safe starting points for any homeowner.
Dye test step by step: remove the tank lid and set it down flat where it cannot slide off, then note the water level against the marked line inside the tank. Add several drops of food coloring or a dye tablet to the tank water, stir gently once without flushing, and leave the toilet untouched for about twenty minutes. Color appearing in the bowl without a flush proves tank water is slipping past the flapper into the bowl, while a bowl that stays clear points toward the fill valve or the level setting instead. For background on isolating fixtures before testing, see what counts as a plumbing emergency.
Level and shutoff checks: with the lid off, confirm the water rests at the marked line rather than pouring into the overflow tube, and flush once to watch the refill stop crisply at that line. If the tank keeps filling past the mark, the float setting or the valve seal is the problem, not the flapper. As a separate check, turn the small supply valve behind the toilet gently, since a running sound that continues with the supply closed comes from elsewhere, while silence confirms the toilet itself is the source. If that small valve sticks or weeps, leave it alone and read how to shut off the water main rather than forcing it.
Safe adjustments you can try without tools
Bottom line: you can safely adjust the chain, the float level, and the flapper seating by hand, and those three moves end many running toilets. Work with the supply on, keep your hands clear of the flush lever linkage while it moves, and change one thing at a time so you know which move helped. If any step needs force, stop, because toilet tank parts are designed to move with light pressure and force breaks them.
Chain and flapper seating: give the chain a little slack, roughly enough that it hangs with a slight bow when the flapper is closed, and unhook one link if it is bar-tight or re-hook it if it is piled up. Press the flapper down lightly once to reseat it, then wipe mineral film from the seat ring with a soft cloth so the disc can seal. Flush and watch, since a flapper that seals after reseating but fails again within days is worn out rather than misaligned, and a fresh flapper matched to the flush valve size is the next move.
Float level setting: find the adjustment on your fill valve, either a screw on top of the valve, a clip sliding along the float rod, or a ring on the float cup, and lower the setting so the refill stops at the marked line inside the tank. Flush twice and confirm the water stops at the mark both times without spilling into the overflow tube. If the level keeps creeping upward after adjustment, grit is holding the valve seal open, and turning the supply off, lifting out the cap assembly, and rinsing the seal area can clear it. When rinsing does not hold, the valve has reached the end of its service and replacement is the honest fix.
| What you observe | Likely cause | Try first |
|---|---|---|
| Bowl refills in short bursts with no flush | Worn flapper leaking tank water into the bowl | Dye test, then reseat or replace the flapper |
| Steady hiss that never stops | Fill valve seal held open by grit or wear | Lower the float, then rinse the valve seal area |
| Water flowing into the overflow tube | Level set too high or valve not closing | Lower the float to the marked line and retest |
| Handle must be jiggled to stop running | Tight chain or sticking handle linkage | Add chain slack and check the handle nut |
| Running plus water at the toilet base | Failed seal or cracked connection below | Stop using it and call for help |
Why running toilets show up often around Chelmsford
Local answer: mineral-bearing town water, firm street pressure, and a large stock of older bathrooms combine to wear toilet internals faster around Chelmsford. Scale films build on flappers and valve seals so they cannot close fully, pressure hammers fill valves overnight, and older supply stops shed rust that lodges in new parts. A toilet that needs its second flapper in a short span is usually telling you about water conditions rather than bad luck.
Housing patterns that matter: colonials near the Center and capes with added baths often carry original supply branches with aging stops, so grit reaches the toilet fill valve every time a valve is disturbed. Finished basements below a bathroom hide the early signs, since a slow tank-to-bowl leak makes no puddle and shows only as a faint running sound. Homes in Lowell and Billerica on the same regional water share the scale pattern, while houses on private wells near Carlisle add sediment that shortens valve life further. Where flow is weak at nearby taps as well, compare notes with low water pressure causes.
Pressure and treatment angle: where street pressure runs firm, a tired fill valve shudders and passes water in the night hours when no other tap is open, which is why the running seems loudest in the early morning. A whole-house softener or filter that is overdue for service can also shed media into supply branches and plug valve seals downstream. If several fixtures show grit at aerators along with the running toilet, ask about water treatment and filtration so the new toilet parts are not fed the same debris that wore out the old ones.
When repair stops making sense
Straight answer: repair fits a sound toilet with available parts, while replacement fits cracks, chronic clogging, a damaged flange, or parts that no longer exist. A tank or bowl with a hairline crack, a base that rocks on a softened flange, or a design that clogs on normal use will not become reliable with another flapper. In those cases a new toilet with fresh stops, supplies, and seals costs less over time than repeated visits for the same bathroom.
Limits of homeowner work: stay on the side of adjustments and like-for-like soft parts, and leave anything involving supply piping, the toilet seal, or the flange to a plumber. Massachusetts plumbing rules place piping alterations and seal resets beyond casual homeowner scope, and a rocking bowl or a weeping supply connection can turn into a floor repair if it is forced. If the toilet backs up into a tub or shower when flushed, the trouble sits in the drain line rather than the tank, and drain cleaning is the right visit instead of another tank part.
How to decide: add up the age of the toilet, the condition of the stops and supplies, and how often the tank has needed attention. One flapper on a solid toilet with working stops is a repair, while layered failures across the flapper, fill valve, handle, and stops point toward a planned swap. Note the brand and model inside the tank lid before calling, since correct parts and a matching replacement choice both depend on it. Describe what the dye test showed and whether the overflow tube is involved, and the visit can be planned with the right parts on hand.
When to call a plumber in Chelmsford
Clear rule: call when water escapes the toilet, the shutoff will not work, or the tank parts have been replaced and the running continues. Water at the base, a supply hose that bulges or weeps, and a valve that spins without closing all mean the next step involves piping rather than adjustments. Call (978) 592-1168 and describe what you see, including the dye test result and where water appears.
What to say on the call: report the toilet location, whether the bowl or the base is involved, what the tank water level does after a flush, and whether the small supply valve turns freely. Mention nearby clues such as weak flow at other taps, gurgling drains, or a ceiling stain below the bathroom, since those steer the visit toward supply, drain, or seal work. If sewage rises in the tub when the toilet flushes, stop using water fixtures and treat it as urgent rather than a tank repair.
What happens on the visit: expect testing first, with the stops checked gently, the tank parts inspected, and the flange and seal examined where the base meets the floor. Sound toilets get factory-matched soft parts with the branch flushed clean before fitting, so grit does not chew the new seals. Toilets that have reached the end get a measured swap with renewed stops and supplies, a fresh seal set to the finished floor height, and a retest of fill level and trap behavior before the tools are packed.
Near you
When to call
Related guides
Frequently asked questions
Why does my toilet run every few minutes?
A toilet that refills in short bursts is almost always passing tank water through a worn flapper into the bowl. The falling level trips the fill valve, which tops the tank up again, and the cycle repeats around the clock. A dye test proves it when color reaches the bowl without a flush. Reseating the flapper and setting chain slack sometimes helps, but a disc with wavy or slimy edges needs replacement with a matched part.
How do I run a toilet dye test at home?
Add food coloring or a dye tablet to the tank water, stir once gently, and leave the toilet unflushed for about twenty minutes. Color showing in the bowl without a flush confirms a flapper or flush valve leak, while a clear bowl points to the fill valve or the level setting. Keep the tank lid somewhere safe while you wait and note the water level against the marked line before and after.
Should I repair my running toilet or replace it?
Repair fits a solid bowl and tank with available flapper and fill parts, a sound flange, and working supply stops. Replacement fits cracks in the tank or bowl, a rocking base on a damaged flange, chronic clogging, or parts that are no longer made. Weigh how often the same toilet has needed attention and the state of its stops and supplies, since layered failures favor a planned swap with fresh seals.
The supply valve behind the toilet will not turn. What should I do?
Leave a stuck supply valve alone rather than forcing it, because forcing old stops often snaps the stem and starts a spray. Use the next upstream valve or the house main to stop water if you must, and mention the stuck valve when you call. A plumber replaces the failed stop and supply hose as part of the toilet visit, which also gives the next repair a shutoff that actually works.
Still stuck?
Describe what you see when you call and a local specialist will guide the next step.